Be sure to read to the end of the article where I go into Step 2 of healing.
This information is not part of our paid course, it is absolutely free. It will help relieve your skin condition no matter what that is, but it will not heal you permanently, there are more steps to address deeper internal issues that cause skin conditions to heal from the root. These are what we address in our paid course.
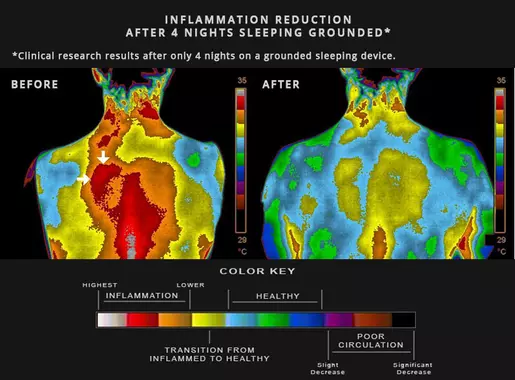
If you have ANY type of inflammation (eczema, psoriasis, swelling from an injury etc) or any sign of Candida (a bacterial overgrowth that causes tons of skin problems and other internal problems), earthing, which is free to do, will help your body begin to recover almost instantly, and after a month of earthing your body will feel so much better.
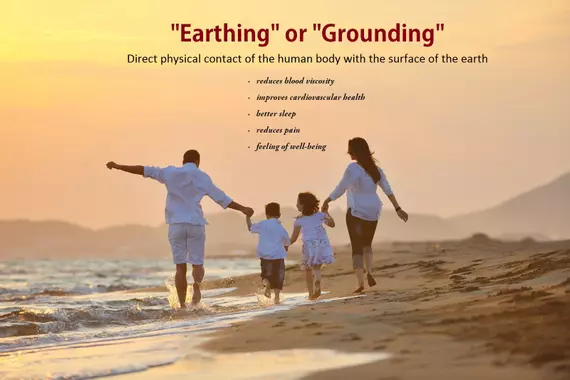
Earthing / Grounding is revolutionary, because it addresses core root problems, not just symptoms, and is beneficial to EVERYONE (yes, everyone, whether you have health issues or not).
There is also another study here with lots of pictures explanations and more info about grounding.
Table of Contents
- Short Earthing Documentary (for those pressed on time)
- Full Length Earthing Documentary
- Earthing Products
- DIY Earthing / Grounding devices that will save you a ton of money, if you’re tight on finances for buying earthing products.
Short Documentary on Earthing (for those pressed on time)
.
Full Length Documentary on Earthing
There are immense benefits to grounding, the list of testimonials, and symtoms that grounding or earthing has helped treat is too numerable to write out here, HOWEVER if you’d like to do more of your own research and take a deeper dive the Earthing Institute website has a wealth of information, testimonials and how to’s.
To ground / earth yourself you can simple buy:
- Grounding Blanket,
- Grounding Pillow Case
- Grounding Bed Sheet
- Grounding Patches other grounding objects or accessories” or you can DIY them.
OR if you just want to go whole hog – you can grab this starter kit below which will save you some money as well.

The Easiest FREE way to ground yourself is simple to stand outside on the dirt or grass with bare feet. Ideally though, you should be grounded all night while you sleep since this is the time the body regenerates and heals itself, and the grounding immensely speeds up your bodies healing and repair process.
ATTENTION – Grounding can have a very powerful cleansing effect the same as detoxifying – therefore you may experience excess sweating, headaches, achy joints and all sorts of other detoxifying symptoms to begin with. If these symptoms occur, SLOW DOWN THE GROUNDING, by grounding for less time during a 24 hour period. Go easy on your body. Increase the grounding time as the symptoms ease.
Or You Can DIY an Earthing Strip
It’s important to note that the palms of the hands and soles of the feet are the most conductive surfaces on the human body. Thus, it’s best to connect any grounded patches, wires, mats, etc. to these areas of the body.
How to ground yourself during the daytime
There are many ways you can Earth, whether at work or at home.
1. Barefoot walking or running on soft grass or dirt is the easiest and cheapest option. If you are new to barefoot activity, for the first few weeks, use this method before sunset (before 6 pm, or even 2 pm if you find you’re sensitive to grounding), since sudden excessive stimulation of nerve endings of the feet can make it difficult later in the evening to sleep.
One effective approach is to Earth on soft grass 30 to 60 minutes in the early morning when the grass is still wet (making it more conductive).
2. You can also ground yourself using a simple do-it-yourself device (shown below). This cheap, homemade device can be used only in the USA and Canada, since it is made for a US-style three-prong outlet. (If you are located in a different country, study the details provided further below.) All parts can be found in a hardware store.

In order to make this grounding appliance, you need: – electrical cable – 2 copper-clad clamps (1 clamp is also sufficient) – 1 standard three-prong plug – electrical tape.
In order to get two grounded copper pieces, you’ll need to connect two wires, creating a split. Stripping back any insulation that’s in the way, connect the wire off the plug to the middle of the second wire with the attached copper-clamp ends. (If you are fine with just one grounded copper piece, no need for two wires; you can simply attach a copper clamp to the other end of the plug wire.) Use electrical tape to secure any connections.
If you happen to use a plug and cable from an old electrical appliance, keep in mind that the ground wire/prong is located in the middle.

Very important: As shown in the appliance photo above, the plug’s 2 upper flat prongs should be bent for safety reasons, leaving only the middle round prong left to plug in for grounding use.
Of course, you can always get electrically connected (i.e., grounded) to the Earth using any copper cable. (Other types of electrical cables can be used, too.) What’s important is that one end of the wire is embedded sufficiently deep in the ground (at least one meter), and the other end is connected to your body. Wet soil “grounds” much better than dry soil. So if it’s bone dry where you’re grounding rod is placed, it doesn’t hurt to water that area down.
The best type of ground for Earthing is moist soil.
Rocky earth will also do, but grounding into dry sand requires burying the wire much deeper, as sand is not so conductive. (If you’re in a sandy area, you can check with an electrician about how far down exactly you should bury your ground wire.)
Again, it’s best to keep the electrodes (copper pieces of the grounding device) on the soles of your feet. An easy way to do this is to slide the electrodes into your socks (in between the bottom of your feet and socks), or attach them to a pair of sandals (as long as the copper is in contact with your feet). Some people like to wear the electrodes on their waist, but in my opinion, this is less preferable due to the superior conductivity of the soles.

More specifically, the flat copper pieces can be attached to your K1 (Kidney 1) acupuncture points (see the picture to the right). These are probably the most conducive places on the skin of the whole body. Surgical tape can be used to fix the copper pieces onto K1 for a better connection.
3. A footbath with salty water, is another great way to ground. To do this, fill a wide footbath basin with 2 to 3 liters of water. Add 2 to 3 tablespoons of sea salt and stir to dissolve. Using a cable with copper electrodes on both ends, keep one electrode in the water and the other one grounded to the the Earth.
If you don’t have any contraindications, you can use this method 2 or 3 (or more) times per day. The footbath provides nearly an ideal connection between Earth and the body, as it grounds the entire surface of the feet.
Grounding the body during sleep
Earthing during sleep is highly suggested, especially for those people who have low morning CP results (that is, low morning body-oxygenation test). Like with any grounding appliance, one end of the grounding cable should be connected to Earth; the other end should preferably connect to some object that will stay in contact with your body while you sleep, even if you move around.
Where can I attach the grounding end?
If it’s not possible to attach your Earthing appliance directly into the ground (e.g., if you live in a high rise building), there are other ways to make the connection, depending on your current location and the availability of plumbing and heating tubes.

1. If your home or office’s electrical sockets are connected to a ground cable (i.e., one that goes down into the Earth), you can plug your device into one of these electrical sockets. The left picture shows what this looks like in the USA and Canada.
2. If you are located in the UK or Ireland, you can disassemble the plug (usually you need to unscrew one or more bolts to do this), so that you plug only the upper-middle prong into the grounded socket. You can do the same in other countries where electrical outlets are grounded to Earth.

3. If you live in continental Europe, you can connect ground wires to plumbing or central heating tubes. (In fact, this can be done anywhere in the world where plumbing is conductive and grounded.) As shown in the image on the right, the copper part of the cable was separated from its plastic coating (this can be done using ordinary scissors); the exposed copper was then fixed in place with electrical tape. (Other types of tape may also be used.) The crucial thing is to make good contact between the metal wire and metal plumbing. Also, make sure that your cable is attached to pure metal that is not painted, as generally paints are nonconductive.

Earthing devices and electrodes for body contact
1. As reviewed above, simple do-it-yourself devices with grounded copper pieces can be used to Earth during sleep. Wear socks to bed, and keep the device’s electrodes in the socks. Optionally, you can use surgical tape to keep the copper pieces attached to the K1 points on your feet.

2. Sleeping on metal conductive tape, attached to your bed linen and connected to a ground, is another way to Earth the body. However, such conductive tapes can be usually be found only in specialty electrical stores. Here is a similar solution on how to ground yourself, but using materials found in many homes.

Ordinary aluminum foil (like the kind used for baking) and wide plastic tape (or duct tape, or blue tape) can easily be used to make a metal grounding strip. (See image on left.)
How? Attach about 50-60 cm (20-24 in.) of aluminum foil to the sticky side of the tape. Next, fix this metal strip in the middle of your bed (as shown on in the image on the right).
Important: Make sure the uncovered metal part is facing up, so that your skin can touch it during sleep.
Warning: Do not use foils from potato chip bags and similar food wrappings. Both sides of such foils are usually covered with a thin (invisible) layer of plastic, which prevents the flow of electrons (i.e., electrical current) needed for grounding.
After your metal strip is in place, you can connect it to the end of a grounded copper wire. It’s best to use electrical tape to do this, as other tapes can be too sticky.
These are not the only ways to ground yourself. Grounded mats, patches, etc. are also available online.
But which methods are best?
Earthing efficiency depends on: – total body surface area that is grounded; – skin conductivity of this area (or resistance); – duration of grounding.
One positive effect for sick people, is that while grounding they tend to have stronger perspiration, which increases the conductivity of their skin. As a result, they get more electrons when grounding.
Warning: Do not use grounding devices during thunderstorms, due to possible lightning strikes. In the long run, personal safety can be increased with the application of one trick that is used for nearly all commercial electronic devices. This trick and its exact parameter is provided here below as your bonus content.
How many hours per day should I ground myself?
The body’s Earthing requirements depend on many factors. Some people are fine with only 1 to 2 hours grounding per day, while some need more (for example, 6 to 8 hours during sleep). Others report that they get optimum benefits when grounded 24/7. Generally speaking, the more inflammation you have in your body, the more grounding you need to heal.
.
Step 2 On Your Journey to Clear Skin, “Healing your Liver and Gut” Here’s How…
Now that you’ve learned the 1st and most important step to healing your body, let’s move onto the 2nd step. Most people don’t realize that their eczema or psoriasis has come about because 1, 2 or 3 of these 3 important organs of the body are struggling. Once you’ve healed these 3 organs your skin just magically and effortlessly clears up and pulls itself back into balance.
Healing these organs are a major milestone in your health and your journey to clear skin. It’s actually very easy to heal these IF you know what to do. We used to teach this as part of our 5 Cores to Clear Skin course but wanted to make it available to more people so we’ve actually extracted Core 2 which deals with healing your liver and gut, from our course and made it available for a fraction of the price.
We also know there are many people that are desperate for help and aren’t able to purchase the whole course, but can easily purchase our discounted “Liver and Gut Healing Core.” The most exciting bit… It always has a transformational effect on everyone who’s put it into practice (so far).
Once you heal these organs your skin will be transformed, and your life will be changed, and you’ll know exactly how to keep your organs in optimal condition for the rest of your life.
Are you ready for clear skin?
Take the next step on your journey and see the details of our “Liver an Gut Healing Core.”

Comments are closed.